Monday, November 8, 2010

The Critical Path Method (CPM)

In the Activity Diagram described in the previous article, a network of tasks were set up to show the dependent sequence of activities within a project. The Critical Path Method can be applied to such as network to answer the most common question asked of project managers: How long will the overall project take?

Some 'project management' computer programs, such as Microsoft Project, will calculate the critical path for you. You can also do it by hand or build a spreadsheet to calculate it, using the method described below.

How does it work?

In the Activity Diagram described in the previous article, a network of tasks were set up to show which tasks needed completion before other tasks could be started. A very common next step is to add timings to show how long each task will take and then to identify the critical path, which is the route through the network that will take the longest amount of time.

Tasks which are not on the critical path have more leeway, and may be slipped without affecting the end date of the project. This is called slack or float.

Tasks on the critical path have no slack and this feature may be used to actually identify the critical path. It is also quite common to have more than one critical path: indeed, the perfectly balanced project is all critical path.


A critical path

It may be possible to reduce the critical path of a project (and consequently pull in the completion date) by rearranging some tasks which have an optional sequence or by moving key people onto tasks in the critical path so you can reduce the time for these tasks.

How do you do it?


1. Build an Activity Diagram, as described in the previous article, including estimating the time required (or duration) for all tasks. Include a space on each task card for early and late start and finish dates or times (times, rather than dates, are required for tasks where hours or minutes are significant).

The early start and early finish are simply the earliest times that a task can start or finish. The late start and late finish are the latest times that a task can start or finish.

2. Starting with the tasks at the beginning of the diagram, complete the early start and early finish for each task in turn, following the arrows to the next task, as in the figure below. The early start of a task is the same as the early finish of the preceding task. If there is more than one predecessor task, then there are several possible early start figures. Select the largest of these. The early finish for each task is equal to the early start plus the duration of the task. The final calculation is for the earliest completion time for the project. This is calculated in the same way as the early start date.


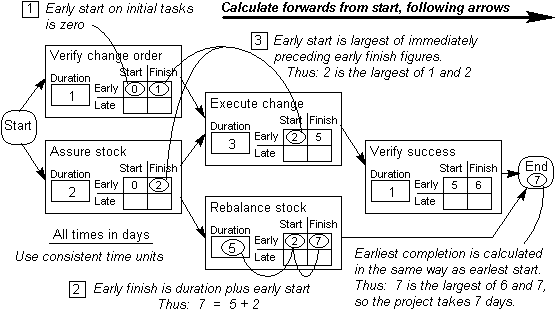
Calculating the early start and finish

3. Starting with the tasks at the end of the diagram, calculate the late start and late finish for each task in turn, following the arrows in the reverse direction to the previous task, as in the diagram below. The late finish is the same as the late start of the succeeding task (for the final tasks in the project, this is equal to the earliest completion date). If there is more than one successor task, then there are several possible late figures. Select the smallest of these. The late start for each task is the late finish minus the duration of the task. The final calculation is for the earliest completion time for the project. This is calculated in the same way as the early start date.


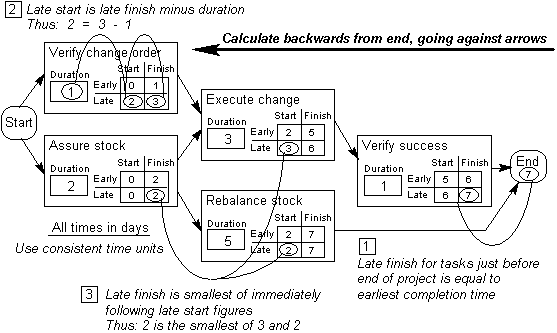
 Calculating the late start and finish

4. You now have, for each task, the earliest and latest times that it can start and finish. Now find the slack time (or 'float') for each task by subtracting the early start from the late start. The slack time is the amount of time the task can be slipped by without affecting the end date of the process. The critical path can now be identified as all paths through the network where the slack time is zero.


Calculating the slack and finding the critical path

Link http://syque.com/quality_tools/tools/TOOLS16.htm

Saturday, November 6, 2010

Stakeholder Analysis

What is it?

A stakeholder analysis is a technique you can use to identify and assess the importance of key people, groups of people, or institutions that may significantly influence the success of your activity or project. You can use this technique alone or with your team members.

Who uses it?

Members of your quality improvement team.

Why use it?

Use a stakeholder analysis to:
  • identify people, groups, and institutions that will influence your initiative (either positively or negatively)
  • anticipate the kind of influence, positive or negative, these groups will have on your initiative
  • develop strategies to get the most effective support possible for your initiative and reduce any obstacles to successful implementation of your program.

When to use it?

Conduct a stakeholder analysis in the early stages of planning a quality improvement initiative.

How to use it:

Develop a Stakeholder Analysis Matrix like the one below:
Stakeholder
Stakeholder Interest(s) in the Project
Assessment of Impact
Potential Strategies for Obtaining Support or Reducing Obstacles


  1. Organize group brainstorming. Identify all the people, groups, and institutions that will affect or be affected by your initiative and list them in the column under "Stakeholder."
  2. Once you have a list of all potential stakeholders, review the list and identify the specific interests these stakeholders have in your project. Consider issues like: the project's benefit(s) to the stakeholder; the changes that the project might require the stakeholder to make; and the project activities that might cause damage or conflict for the stakeholder. Record these under the column "Stakeholder Interest(s) in the Project."
  3. Now review each stakeholder listed in column one. Ask the question: how important are the stakeholder's interests to the success of the proposed project? Consider:
    • The role the key stakeholder must play for the project to be successful, and the likelihood that the stakeholder will play this role
    • The likelihood and impact of a stakeholder's negative response to the project
    Assign A for extremely important, B for fairly important, and C for not very important. Record these letters in the column entitled "Assessment of Impact."
  4. The final step is to consider the kinds of things that you could do to get stakeholder support and reduce opposition. Consider how you might approach each of the stakeholders. What kind of information will they need? How important is it to involve the stakeholder in the planning process? Are there other groups or individuals that might influence the stakeholder to support your initiative? Record your strategies for obtaining support or reducing obstacles to your project in the last column in the matrix.

Wednesday, November 3, 2010

Benefits of Use Case Modeling

Use Case Modeling takes effort and time, and requires a certain degree of expertise. Why do we do Use Case Modeling then ? What are the benefits of such an approach ?

Use cases are an effective technique for capturing and communicating functional requirements. Use cases provide some very clear benefits to the Analysis Phase.
- One important benefit of use case driven analysis is that it helps manage complexity, since it focuses on one specific usage aspect at a time. Use cases start from the very simple viewpoint that a system is built first and foremost for its users.
 - Use cases also encourage designers to envision outcomes before attempting to specify outcomes, and thereby they help to make requirements more proactive in system development.
- Good way to start identifying objects from scenarios
- Test plan can be immediately generated based on use cases
- Easier user validation
- Helps technical writers in preparation of the user manual from an early stage
- Better traceability throughout the software cycle
- Exception scenarios identified earlier leading to better quality
- Use cases focus on the users of the system, not the system itself, thus the real system needs are brought to light early on.
- Since a use case consists mainly of narrative text, it is easily understandable by all stakeholders, including customers, users and executives, not just developers and testers.
- By including all the stakeholders during the early planning stages of a project, you bring in people who best understand the problems at hand, promote a sense of buy-in from end users, and eliminate surprises when the system is deployed.
- One of the big benefits of use case modeling is that it also describes all of the things that might go wrong.
- Once a use case model has been developed, it can be used to drive many other aspects of software development, including project planning (cost, complexity and timing estimates), object models, test case definitions, and user documentation.
- Use cases have proven to be easily understandable by business users, and thus to act as a bridge between them and software developers.
- Use cases organise and structure the requirements model, permitting common behaviour to be factored out.
- Use cases are reusable within a project. A use case can evolve at each iteration, from a method of capturing requirements, to development guidelines for programmers, to a test case and finally into user documentation.
- Use cases make it easy to take a staged delivery approach to projects; they can be relatively easily added and removed from a software project as priorities change.
- Use cases and use case diagrams recorded using UML can be maintained with widely available CASE tools, and thus be fully integrated with other analysis and design deliverables created using a CASE tool. The result is a complete requirements, design, and implementation repository.

Posted by Ashish

Tuesday, November 2, 2010

Soft Systems Methodology (Checkland)

Applying Systems Thinking to non-systemic situations. Explanation of Soft Systems Methodology of Checkland. 
Contributed by: Peter Weeks  


What is the Soft Systems Methodology? Description
The Soft Systems Methodology (SSM) from Peter Checkland is a qualitative technique that can be used for applying Systems Thinking to non-systemic situations. It is a way of dealing with problem situations in which there is a high social, political and human activity component. This distinguishes SSM from other methodologies which deal with HARD problems that are often more technology-oriented.

SSM applies Systems Thinking to the real world of human organizations. But crucially without assuming that the subject of enquiry is itself a simple system. SSM therefore is a useful way to approach complex situations and corresponding messy questions.
 
Origin of the Soft Systems Methodology. History
SSM originated from the understanding that "hard" Systems Thinking, such as Operations Research techniques, is inadequate for enquiring into large, complex organizational issues. Soft Systems Methodology was developed by Peter Checkland for the express purpose of dealing with problems of this type. He had been working in the industry for a number of years and had been working with a number of hard system methodologies. He saw how these were inadequate for the purpose of dealing with extremely complex problems which had a large social component. Therefore in the 1960s he goes to the University of Lancaster in an attempt to research this area, and to deal with these soft problems. He conceives his "Soft Systems Methodology" through a number of research projects in industry and its application and refinement over a number of years. The methodology, which is pretty much how we know it today, was published in 1981. By that time Checkland was firmly entrenched in University life and he had left the industry to pursue a career as a professor and researcher in Software Engineering.

Usage of the Soft Systems Methodology. Applications
  • Any complex, organizational situation where there is a high social, political and human activity component.
Steps in the Soft Systems Methodology. Process
The following steps should be taken (often several iterations are needed):
  1. Investigate the unstructured problem.
  2. Express the problem situation through "Rich Pictures". Rich Pictures are a means of capturing as much information as possible relating to the problem situation. A rich picture can show boundaries, structure, information flows, and communication channels. But in particular it shows the human activity system. This is the element that is not included in models such as: data flow diagrams or class models.
  3. Root definitions of relevant systems. From what different perspectives can we look at this problem situation?
    • Root definitions are written as sentences that elaborate a transformation. There are six elements that make a well formulated root definition. They are summed up in the acronym CATWOE:
      • Customer. Everyone who may gain benefits from a system is considered as a customer of the system. If the system involves sacrifices such as layoffs, then those victims must also be counted as customers.
      • Actor. The actors transform inputs into outputs and they perform the activities defined in the system.
      • Transformation process. This is shown as the conversion of inputs to outputs.
      • Weltanschauung. The German expression for world view. This world view makes the transformation process meaningful in context.
      • Owner. Every system has some proprietor, who has the power to start up and shut down the system (power of veto).
      • Environmental constraints. These are external elements that must be considered. These constraints include organizational policies as well as legal and ethical matters.
  4. Conceptual models.
    • Formal system concept.
    • Other system thinking.
  5. Comparison of 4 with 2.
  6. Feasible, desirable changes.
  7. Action to improve the problem situation.
Strengths of the Soft Systems Methodology. Benefits
  • SSM gives structure to complex organizational and political problem situations, and it can allow them to be dealt with in an organized manner.  It forces the user to look for a solution that is more than technical.
  • Rigorous tool to use in "messy" problems.
  • Specific techniques.
Limitations of the Soft Systems Methodology. Pitfalls
  • SSM requires from participants to adapt to the overall approach.
  • Be careful not to narrow the scope of the investigation too early.
  • It is difficult to assemble the richest picture, without imposing a particular structure and solution on problem situation.
  • People have difficulties to interpret the world in the loose way. They often show an over-urgent desire for action.
Assumptions of the Soft Systems Methodology. Conditions
  • Assumes that most management and organizational problems cannot be seen as pure "systems problems" as the system is far too complex to analyze.
  • Nevertheless applying a systemic approach in a non-systemic situation is valuable.

Monday, November 1, 2010

Writing effective Use Case Examples

A great way for writing effective use cases is to walk through a simple use case example and watch how it can be leveraged to something complex. By absorbing the meaning of what use case diagrams, alternate flows and basic flows, you will be able to apply use cases to your projects.

In this section, I'm going to walk you through writing effective use cases for a mock Ebay site. Most of us know and love Ebay, so if you don't know Ebay, go to Ebay and navigate through the site and come back to our example. Imagine that only you know Ebay, but nobody has ever seen Ebay and you have to write the requirements for Ebay using use cases, and explain it to people who have never seen it.\


STEP 1. When creating use cases, be productive without perfection

STEP 2. Define your use case actors

STEP 3. Define your use case Actor Goals

STEP 4. Identify reuse opportunity for use cases

STEP 5. Create a use case index

STEP 6. Identify the key components of your use case

STEP 7. Name and briefly describe your use case

STEP 8. Create the use case basic flow

STEP 9. Create the use case alternate flows

STEP 10. Produce your use case document

STEP 11. Generate a Use Case Model Diagram

STEP 1. To write effective use cases, be productive without perfection

When it comes to writing effective use cases, you don't need to be a perfectionist and concern yourself with getting it right the first time. Developing use cases should be looked at as an iterative process where you work and refine. You can always refine it later, so again, don't go for perfection from the get-go. Loosen up and have some fun while you're doing it.

STEP 2. Define your use case actors

There are possibly over a dozen actors that interact with Ebay, from buyers and sellers, down to suppliers, wholesalers, auditors, and customer service. But we're going for grass-roots, so who are the basic users of Ebay? BUYERS and SELLERS. So lets put them down as our first actors. (The visual notation in the figures below is based on UML -- Unified Markup Language for Use Cases)


Do you notice how the actors aren't John and Sue which would be people? While John may be a seller and Sue may be a buyer, an actor is a Role. And a role in this case would be that of a buyer and that of a seller. Now that things are clicking, lets throw some more actors on your paper just so we can try and identify more possible users.


Now we have a bunch of actors. Wait a minute? Paypal? That's not a person. An actor can be a system, because a system plays another role in the context of your new system and has goals and interacts with other actors as you will see later.

STEP 3. Define your use case Actor Goals

Now that you have established your actors (system users), or most of them, the next logical step is to outline what the goals are of each actor. One you have established your actors and the goals of each actor, you have now created your initial list of high level use cases. In the example below you will see the representation of actor goals. Again, don't try and capture 100% of this step, in requirements management, refinement is always part of the entire process. Effective use cases should have understandable actors and goals.


STEP 4. Identify reuse opportunity for use cases

In this step, you are going to cross the bridge into object modeling. Don't get overly concerned about terms like generalization, inheritance and extends. The goal of this Ebay use case example is to keep it understandable so we will explain this concept in terms of the example.

What does the word general mean? Something is broad and not as detailed. Generalization is when you "inherit" from something general and then add more detail. A "person" is very general. A "man" is still general, but not as general as a "person". You can say that a "man" inherits behavior and atributes of a "person".

Look at the requirements management use case diagram above and you will see there is duplicate behavior in both the buyer and seller which includes "create an account" and "search listings". Rather than have all of this duplication, we will have a more general user that has this behavior and then the actors will "inherit" this behavior from the new user.


The above use case example diagram illustrates that a generic user creates accounts and search listings and that a buyer and a seller have their own behavior but also have the behavior of the generic user. The benefits of generalization are that you eliminate duplicate behavior and attributes that will ultimately make the system more understandable and flexible. We will see in later steps that this inheritance applies both to use cases and to the actors.

STEP 5. Create a use case index

After producing your initial visual list of use case actors and goals, we can take this list and create an initial use case grid which provides the basis for the use case index. Every use case will have various attributes relating both to the use case iteself and to the project. At the project level, these attributes include scope, complexity, status and priority.


This use case index should be used by the project team to define the use cases against. It will serve as a master inventory to help writ effective use cases for the requirements phase of the project.

STEP 6. Identify the key components of your use case

The actual use case is a textual representation illustrating a sequence of events. In our use case example, you will see that there are several components of a use case which we will review. In the mean time, review the table below to get a basic understanding of what is in the use case and then we will review each element as we progeress through our use case example.


Use Case ElementDescription
Use Case NumberID to represent your use case
ApplicationWhat system or application does this pertain to
Use Case NameThe name of your use case, keep it short and sweet
Use Case DescriptionElaborate more on the name, in paragraph form.
Primary ActorWho is the main actor that this use case represents
PreconditionWhat preconditions must be met before this use case can start
TriggerWhat event triggers this use case
Basic FlowThe basic flow should be the events of the use case when everything is perfect; there are no errors, no exceptions. This is the "happy day scenario". The exceptions will be handled in the "Alternate Flows" section.
Alternate FlowsThe most significant alternatives and exceptions


STEP 7. Name and briefly describe your use case

Now that you have a general understanding of what a use case consists of, we are ready to start creating our use case. Typically, while the name of your use case is being discussed, people will start briefly describing the use case. Use plain english and keep it simple. Getting back to our use case example, I will begin with use case #1 from step number four.

Use Case Number: 1
Use Case Name:Buyer Places a Bid
Description:An EBAY buyer has identified an item they wish to buy, so they will place a bid for an item with the intent of winning the auction and paying for the item.


STEP 8. Create the use case basic flow

The basic flow of a use case represents the most important course of events or what happens most of the time, sometimes referred to as the 'Happy Day Scenario' because it is what occurs when everything goes well -- no errors or exceptions. Another reason why the basic flow is so critical is because it's much easier to fully comprehend the exceptions once the norm is understood and if the basic flow represents 70% of the system, the development staff is much more prone to implementing the correct code in the first pass.

For our use case example, the basic flow should be to describe the happy day scenario for your use cases such as "placing a bid". For a consumer to play a successful bid, what is the primary flow when everything goes as planned. An effective use cases needs to have the basic flow before moving forward with writing the alternate flows.

STEP 9. Create the use case alternate flows

The basic flow is the key ingredient to your use case and some can argue that you can stop once you're done with the basic flow. It really depends on the level of detail you wish to achieve. However, providing more detail to the consumers of your use case is always a good thing.

The alternate flows providing the following:
  • An exception or error flow to any line item in your basic flow
  • An additional flow, not necessarily error based, but a flow that COULD happen
A few examples of alternate flows are:
  • While a customer places an order, their credit card failed
  • While a customer places an order, their user session times out
  • While a customer uses an ATM machine, the machine runs out of receipts and needs to warn the customer


STEP 10. Produce your effective use case document

Recently at a new project assignment, I introduced a mid level developer to the concept of use cases which was totally foreign to him. Once walking him through the basic concepts and showing him the use case example, the lightbulb went off in his head on how convenient and simple it was to grasp the project.

A few reasons why it's that much easier to learn a system through use cases then a traditional requirements document is probably because with use cases, you are introduced to concepts at a high level, walk through a living scenario and then presented with specifications last.

In several places in this document, I have stated "effective use cases" rather than just "use cases". The purpose of the use cases is for effective knowledge transfer from the domain expert to the software developer -- these use cases will serve as software requirements. If they don't make sense to the person building the software, they are not effective. There are several sources on the web for writing effective use cases including the book by Alistair Cockburn.

STEP 11. Generate a Use Case Model Diagram

You can use the Gatherspace.com use case modeling tool to produce a use case model within a few clicks. Once you define your use cases and actors, just go into the reporting section and click on the 'Use Case Model' report and that's it. From the main use case model, you can continue to drill down into the use cases.

To see what this looks like, click the use case model sample now.

In several places in this document, I have stated "effective use cases" rather than just "use cases". The purpose of the use cases is for effective knowledge transfer from the domain expert to the software developer -- these use cases will serve as software requirements. If they don't make sense to the person building the software, they are not effective. There are several sources on the web for writing effective use cases including the book by Alistair Cockburn.